How realistic does a shooter game look with squares? Squares were helpful for learning, but now you want a ship and enemies that look more like an arcade game. The code changes in this lesson will do that for you.
The Ship and Enemy classes were created as subclasses of the RectangleMorph class. RectangleMorph works well for drawing the shapes that you used for your ship and enemies, but now you will be using a graphic image for them. A different subclass of Morph will be needed. Since your ship and enemies will display images, they will need a morph class that does this. The well named class ImageMorph is the one for the job. These two classes will need to be changed from RectangleMorph to ImageMorph.
1. In your Ship class enter and save the following code change to your initialization method. This change will load the image that you want to use for your ship. (Note: Provide the full path and filename for the Ship.png file. If you prefer to use just the filename, place the Ship.png file in the “shared” directory within the main directory of Squeak.)
Ship>>initialize
super initialize.
self image: (ImageReadWriter formFromFileNamed: 'Ship.png')
2. For the following code changes, a few extra steps are needed while the game is still running. If you quit the game, you would not need to do these steps – just the code changes.
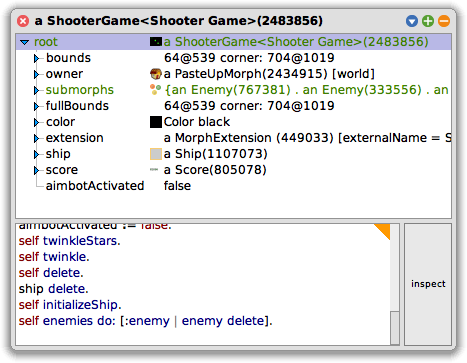
3. If your explore morph window is still open, select ShooterGame (which will be the root). If the window is not open, open a new explore morph window for your running shooter game. Your explorer window should look similar to Figure 1 below.

4. Type the following expression in the explorer workspace window then select “do it”.
ship delete.
5. Now that the ship has been removed from the game, make the following change to your Ship class.
ImageMorph subclass: #Ship
instanceVariableNames: ''
classVariableNames: ''
poolDictionaries: ''
category: 'ShooterGame'
6. You can now create a new instance of Ship by typing the following expression in the explorer workspace window, then selecting “do it”.
self initializeShip.
7. You will now see your fancy new ship!
8. Let’s not stop there. Now make the following code change to your Enemy>>initialize method. This change will load the image that you want to use for your enemies. (Note: Provide the full path and filename for the Enemy.png file. If you prefer to use just the filename, place the Enemy.png file in the “shared” directory within the main directory of Squeak.)
Enemy>>initialize
super initialize.
self image: (ImageReadWriter formFromFileNamed: 'Enemy.png').
direction := 10
9. Now make the following change to your Enemy class. Note that you will receive an error when you save the change below.
ImageMorph subclass: #Enemy
instanceVariableNames: 'direction'
classVariableNames: ''
poolDictionaries: ''
category: 'ShooterGame'
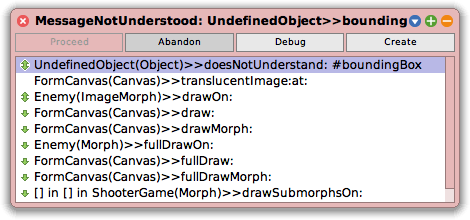
10. You will receive a predebugger window like the one in Figure 2. You can ignore this error and close the window. This error occurs because the Enemy class now inherits from ImageMorph instead of RectangleMorph. As a result, the existing Enemy instances are now confused, and you will see red squares in their place. This issue was avoided with the Ship class because it was deleted first. Enemies cannot be deleted as easily because ShooterGame>>step continues to create new instances of Enemy. There are many ways around this, but this way is simple and good enough for now.

11. You can now create new instances of Enemy by typing the following expression in the explorer workspace window, then selecting “do it”.
self enemies do: [:enemy | enemy delete].
12. Check out those menacing enemies! They certainly look fiercer than boxes!
13. Now try shooting some enemies. You might notice something a little off. Your shots look quite large for your ship. Where can this be changed?
14. In your Shot class make the following changes to your initialization method.
Shot>>initialize
super initialize.
self color: Color red.
self extent: 10 @ 10.
aimbotEnabled := false.
aimbotSteps := 800
15. Try shooting some enemies. The shot size looks much better now.
16. Save and Quit your Smalltalk image.