In the last lesson you made code changes to give an enemy the ability to move and use the Morphic animation system. You also made code changes to prevent the enemy from moving off the game screen. However, you were left with a problem to consider – how to move the enemy left instead of right?
Every time the method move executes it will not know which direction your enemy is moving or wants to move – your move method will only have the ability to find out where the enemy is on the game screen. You need something that remembers information before and after the move method executes. With this something, your method can then know which direction it needs to move the enemy towards.
This situation is where an instance variable will be useful. If you remember, you declared the instance variable ship in your ShooterGame class. The ship instance variable allows easy access to the Ship instance. For this situation, you will use an instance variable to remember the direction of your enemy. Because your method needs to know the direction that the enemy is going, the name direction for your instance variable will work very nicely.
1. Add the direction instance variable in the Enemy class. Make the following change below and save it.
RectangleMorph subclass: #Enemy
instanceVariableNames: 'direction'
classVariableNames: ''
poolDictionaries: ''
category: 'ShooterGame'
2. All Enemy instances now have the direction instance variable. This instance variable can be used to remember which direction the enemy is heading.
3. Now that the direction instance variable provides the ability to remember which direction an enemy instance is moving, you will need to give it a starting value. This starting value will let the enemy instance know which direction it should start with.
4. In order to start a new enemy instance in a direction, the Enemy>>initialize method would be a great place to set the starting direction. Make the following changes to Enemy>>initialize and then save the changes.
initialize
super initialize.
self color: Color green.
self borderColor: Color honeydew.
self extent: 32 @ 32.
direction := 10
5. The value for direction will now be used to let the enemy know to move right when it starts.
6. Now that an enemy instance can know whether it is moving right or left, you can make the code changes to Enemy>>move so it can move the enemy right or left.
move
self x: self x + direction.
(self right > owner right)
ifTrue: [direction := -10].
(self left < owner left)
ifTrue: [direction := 10].
owner changed
7. Look at each line of code. Can you figure out what each line of code is doing? How is the newly declared direction instance variable being used in this method?
8. Because your currently running enemy instance was created before the direction instance variable was declared, your enemy does not have an assigned direction value. Its value will be nil. The value nil means “nothing.” Your enemy cannot use “nothing” for a direction. So, you have a few options if you want to send the move method to your running enemy. Choose and follow one of the options below:
9. In an explore morph window, run “self move.” on enemy instance. Remember to select the enemy first.
10. Test your code changes by running the expression “self move.” on your enemy object in an explore morph window.
11. What do you notice about your enemy with your new code?
12. You might have noticed that your enemy will go out of bounds just a little bit. You can fix this by making the following changes to Enemy>>move.
move13. Go ahead and enable stepping for your enemy morph. In an explore morph window run the “self startStepping.” expression on your current enemy. Remember to select the enemy first.
14. What else needs to be done for your shooter game?
15. Save and Quit your Smalltalk image.
Congratulations on selecting the advanced solution! Your effort here will help you to understand and use the Smalltalk debugger even better.
1. In an explore morph window, run “self move.” on your enemy instance. Remember to select the enemy first.
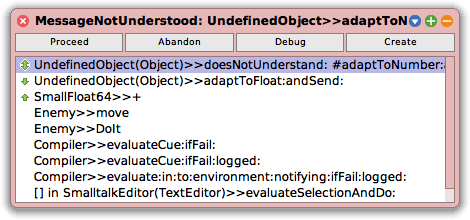
2. A predebugger window like the one in Figure 1 below will be displayed. The error message says that there is an undefined object (UndefinedObject). Press the “Debug” button to proceed to the debugger (or press any key).

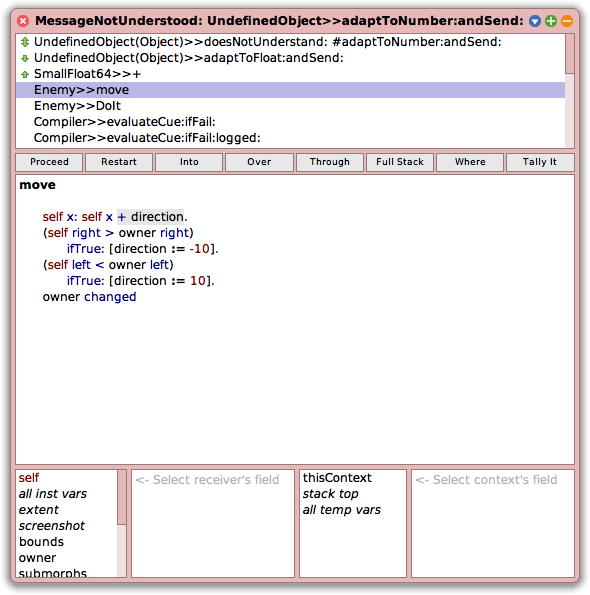
3. The debugger will now be displayed. The last 3 lines in the execution stack show that a numeric operation was attempted on an object that is undefined. Selecting any of the lines will show, in the middle pane, the Smalltalk code being executed in that method, with the part that triggered the error highlighted. Select “Enemy>>move” in the stack to see where in your method the error was triggered.
4. The debugger window will look like the one below in Figure 2. The error was triggered in Enemy>>move with “+ direction.” Because you recently made a change with the direction instance variable, it would be a good thing to look at first.

5. The 4 panes below the middle pane allow you to inspect various aspects of the objects in the middle method pane.
6. All of these panes can be used to run, inspect, and change values to see how your code works. Remember, method code in the middle pane can be changed, but be careful not to change methods that are not yours (Smalltalk methods for example). Otherwise you could crash or break something with your Squeak image without the ability to fix it.
7. Select the direction instance variable in the bottom left pane, like Figure 3 below. The pane on the right shows its value. This is the problem. Our method is attempting to add nil as the value of direction, but nil cannot be used like a number.
8. Replace nil with the value “10” and save the value by choosing “accept” or pressing Ctrl-s.
9. In the debugger press the “Restart” button. This will restart the use of the selected method. In this case it is Enemy>>move.
10. Now press the “Proceed” button. This will remove the debugger window, execute Enemy>>move, and move your enemy.
11. Congratulations for taking the advanced solution!
12. Return to Step 8.3.